How to Manage Cron Jobs and Deployment Jobs in App Platform
Validated on 11 Feb 2026 • Last edited on 5 Mar 2026
App Platform is a fully managed Platform-as-a-Service (PaaS) that deploys applications from Git repositories or container images. It automatically builds, deploys, and scales components while handling all underlying infrastructure.
Jobs can consist of any application code you want to run at a specific time. App Platform supports two ways to run jobs:
- Deploy-time jobs, which run before or after a deployment
- Scheduled (cron) jobs, which run on a recurring schedule using a cron expression
For deploy-time jobs that run after a deployment, you can further choose whether the job runs only after a successful deployment or also after a failed deployment.
Like workers, jobs are not routable, meaning they run in the background and cannot accept HTTP or HTTPS requests.
Add a Job to an App Using Automation
You can add a job to an app using the CLI’s app update command or the API’s app update endpoint. To add a job, update the app’s spec with the job’s specifications and submit the spec using the following command or endpoint.
Add a Job to an App Using the Control Panel
The following steps show how to create a scheduled (cron) job. Other job types follow the same process, with slight differences that are noted.
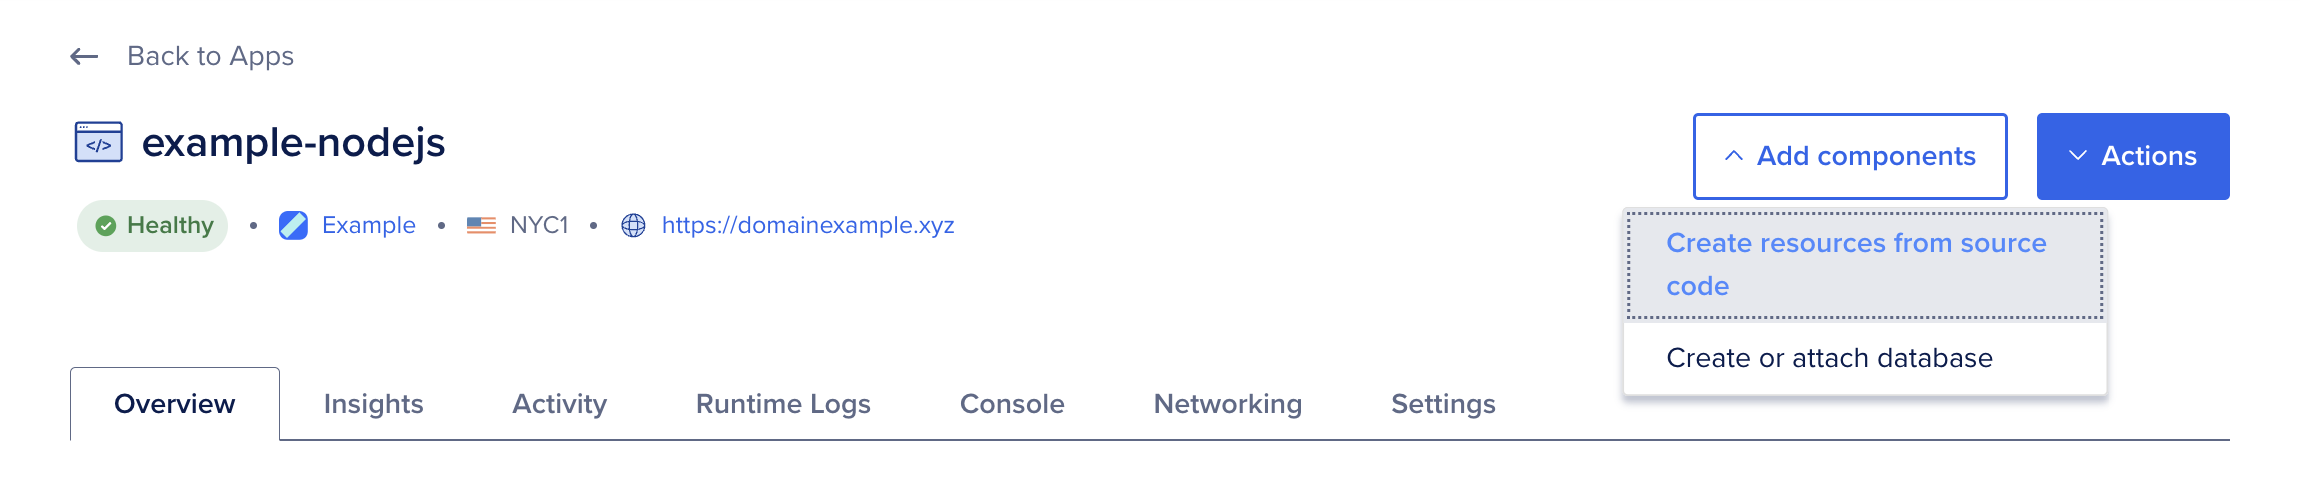
Go to the Apps page and select your app. Click Add components, then choose Create resources from source code.
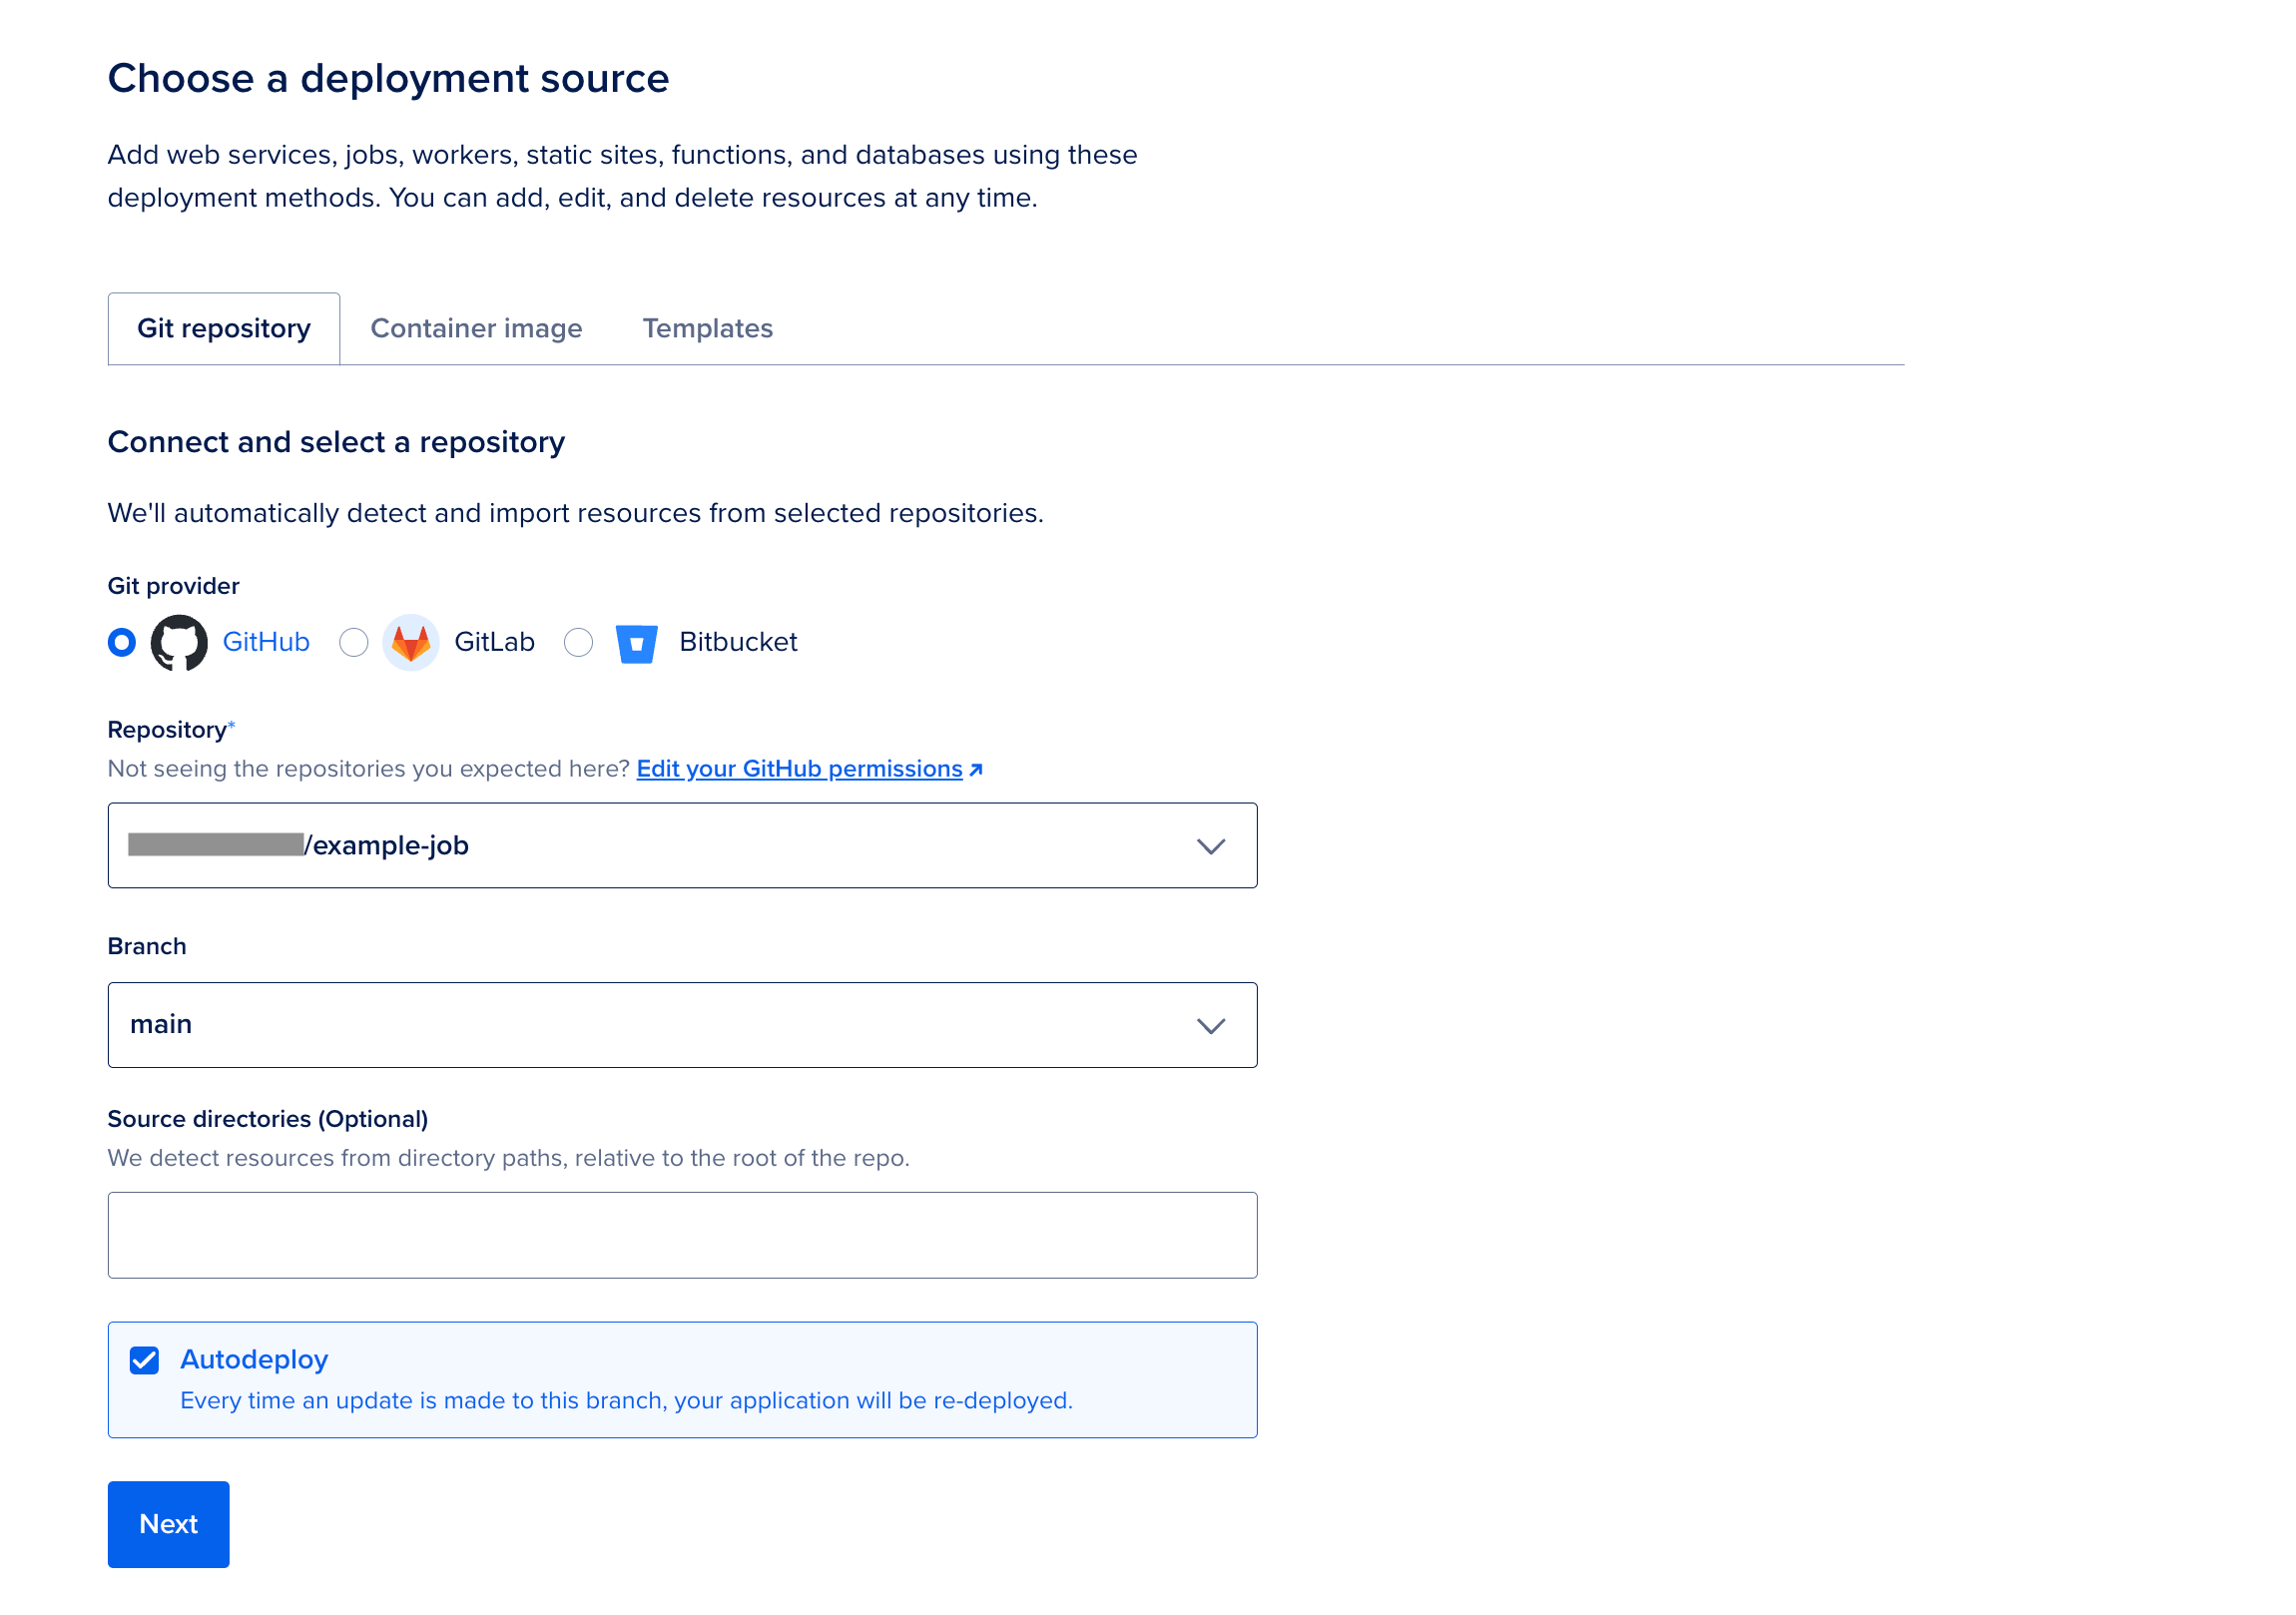
On the Add resources screen:
- Select your deployment source, either a Git repository or a container image. If you have not previously created an app on App Platform, the repository service may prompt you to provide DigitalOcean with read permissions to your account.
- If using a Git repository, choose a branch to deploy from. By default, App Platform builds from the repository's root. If your code lives in a subdirectory (for example, in a monorepo), set the source directory to match.
- Clear the Autodeploy checkbox if you want to stop automatic redeploys when the repository changes.
- Click Next.
App Platform retrieves your code, analyzes your repository, and automatically selects the appropriate runtime (such as Node or Ruby). If you need to override this behavior, upload a Dockerfile to your branch and restart the creation process.
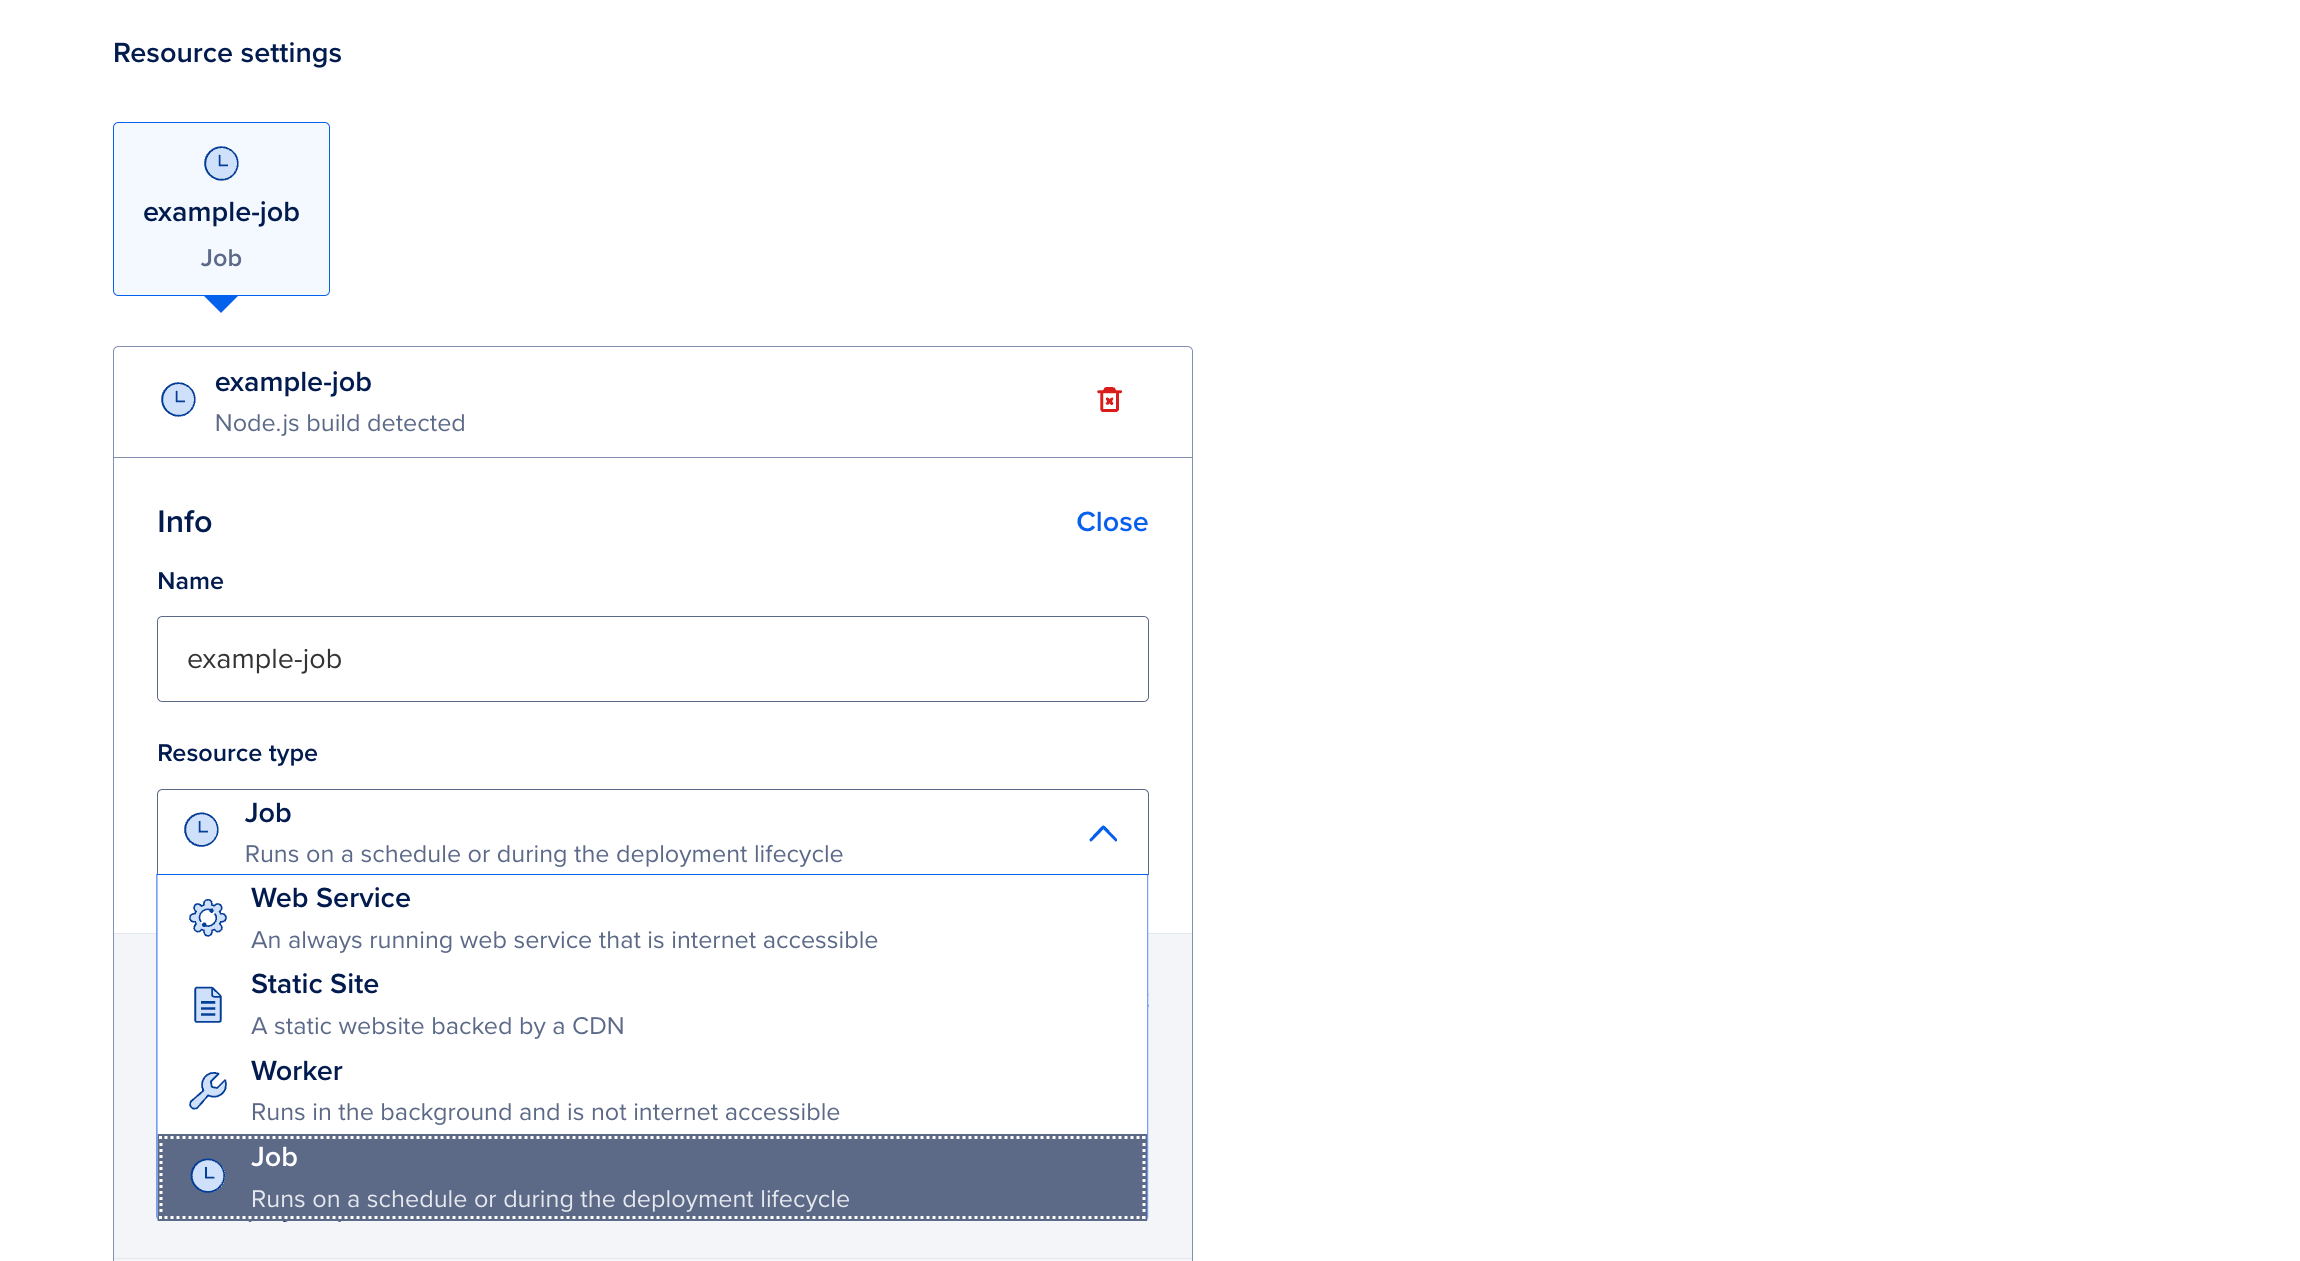
The screen updates to display the Resource settings table. In the Info section, click Edit, then select Job in the Resource type dropdown menu.
In the Deployment settings section, verify the run command for the job. If needed, click Edit to update it. If no run command is specified, App Platform uses the default command for the runtime (for example, npm start for Node.js components). For Dockerfile-based builds, entering a run command overrides the Dockerfile’s entrypoint.

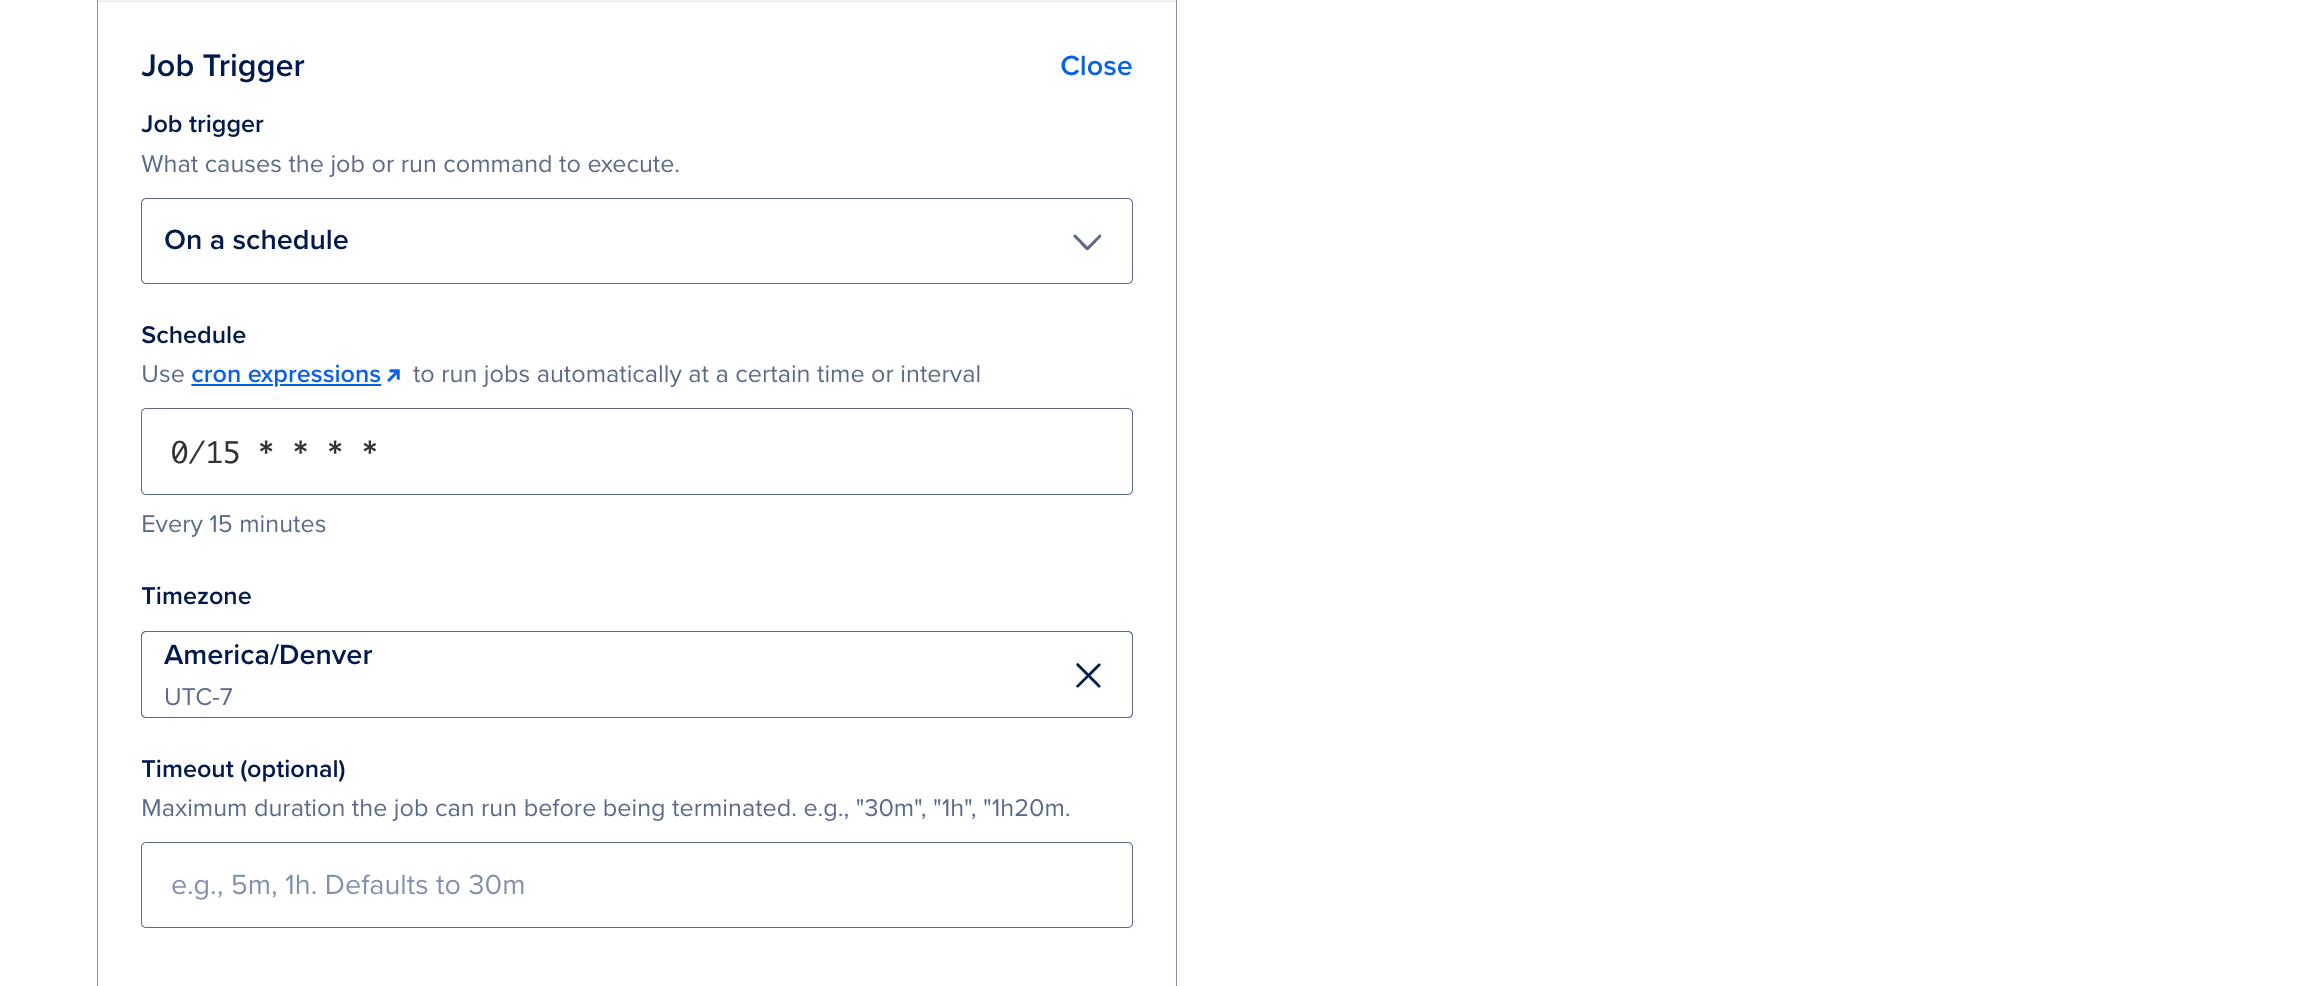
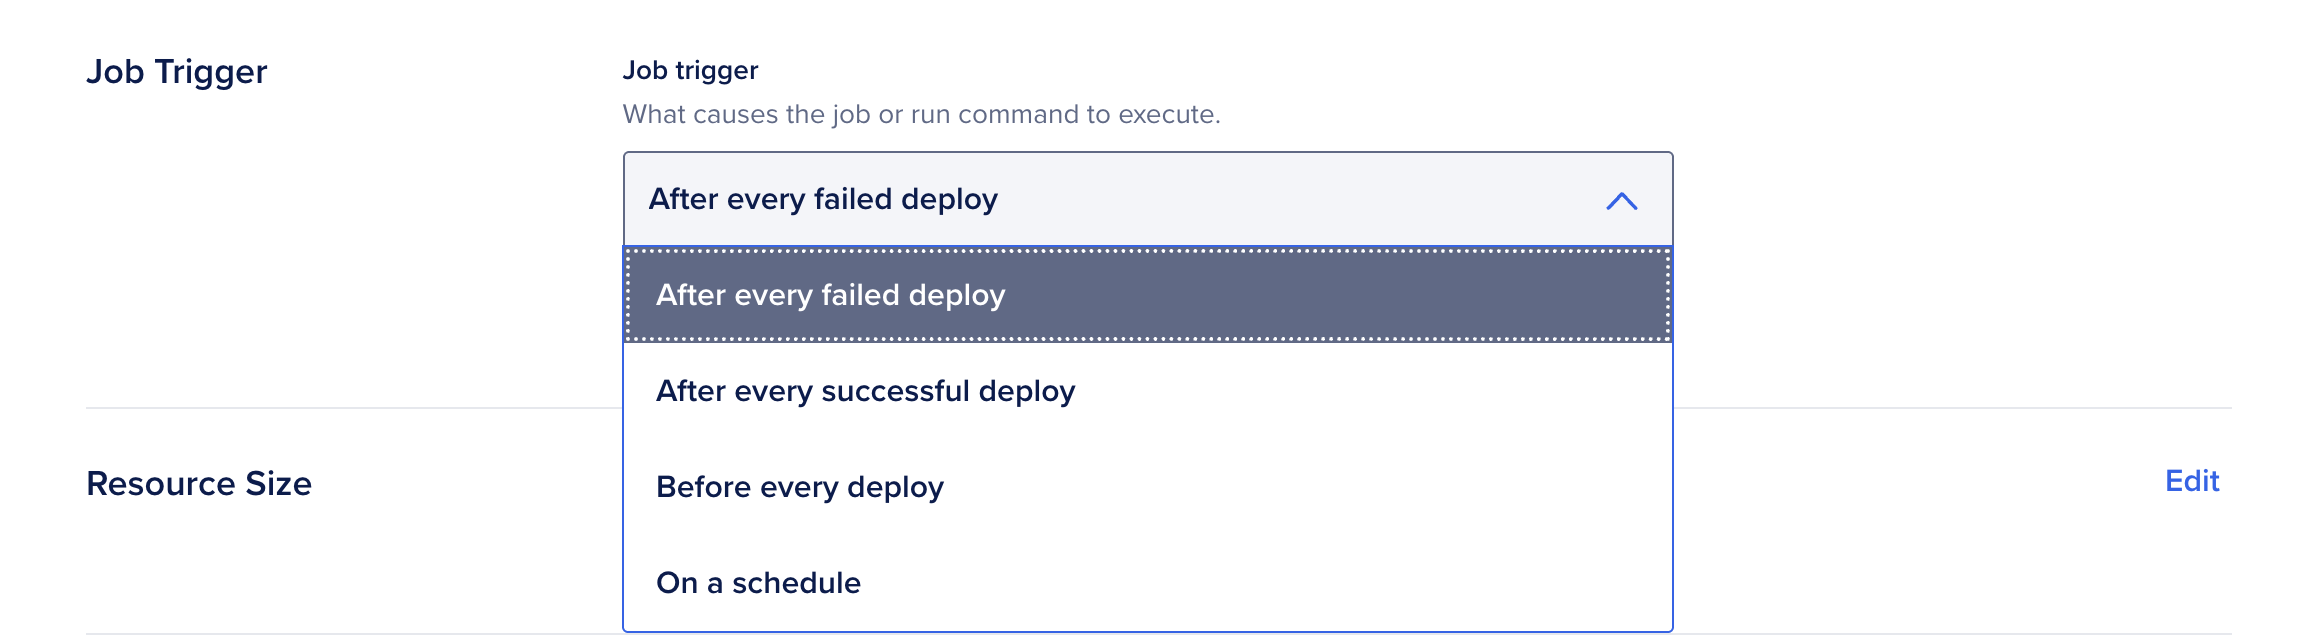
In the Job trigger section:
- Click Edit, then select On a schedule for a cron job. For other jobs, the options include After every failed deploy, After every successful deploy, and Before every deploy.
- (Cron only) In the Schedule field, enter a cron expression to run the job at a specific time or interval (minimum every 15 minutes).
If needed, update environment variables or the instance size for the job. Environment variables are often required for database credentials or API keys. For resource-intensive jobs, you can increase the instance size.
When finished, click Add resources to add the job and redeploy your app.
After the job deploys, it appears as a component at the top of the Settings tab.

To view the job’s activity, go to the Activity tab and click Jobs.

Schedule Jobs Using the App Spec
To schedule a job, update the app spec with the following template, setting kind to SCHEDULED and configuring schedule with a cron expression (minimum of every 15 minutes) and time zone like this:
jobs:
- name: hello-world
  kind: SCHEDULED
  schedule:
    cron: "*/15 * * * *"
    time_zone: Asia/Kolkata
...Edit Jobs
Go to the Apps page, select your app, then click the Settings tab. Select the job you want to edit.
Click Edit beside a setting you want to change, then click Save.
You can also edit the Job Trigger to change when the job runs.
Destroy Jobs
Go to the Apps page, select your app, then click the Settings tab. Select the job you want to destroy.
At the bottom of the page, click Destroy Component. Enter the job's name to confirm, then click Destroy.